

 Having just taken delivery of a joystick module from Deal Extreme I wrote a small script to test it, and thought it would be wise to post it here for reference. It doesn’t do a lot except take the inputs form the X and Y axis and the button state and print these to the serial port. I plan to use this later for navigating a menu, but for now we want to check this product is working and so we have the simple script.
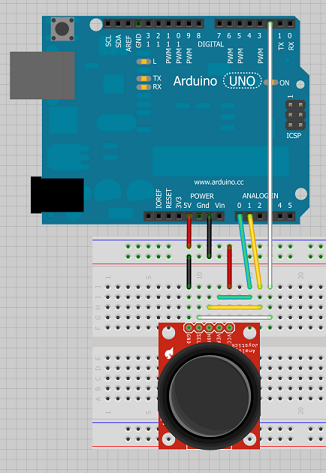
As usual we start by setting everything up as per the Fritzing diagram.
The joystick has two potentiometers that provide a variable analogue input that can be measured. The Arduino analogue port measures the signal and reads that as a value between 0 and 1024. It is not important at this stage, but the axis are usually referred to as the X and the Y axis, just like on a graph. The button is a simple digital push button, but we will need to use the Arduino pull-up resistor to prevent the state floating.
I will be writing for Arduino 1.0.3, and although most of the code will work with older versions of the program, I can make no guarantees.
Code begins with defining our variables
[php]
// These constants won’t change.
const int analogue0 = A0; // Analog input pin that the potentiometer is attached to
const int analogue1 = A1; // Analog input pin that the potentiometer is attached to
const int jbutton = 2;
int a0Value = 0; // value read from the x-axis
int a1Value = 0; // value read from the y-axis
int jbValue = 0; // value read from the joystick button
[/php]
Then we set up pins and serial out put
[php]
void setup() {
// initialize serial communications at 115200 bps:
Serial.begin(115200);
pinMode(jbutton, INPUT_PULLUP); // Set button as input and enable pullup
}
[/php]
…and finally we read the states;
[php]
void loop() {
// read the analogue values, and the button state
a0Value = analogRead(analogue0);
a1Value = analogRead(analogue1);
if (digitalRead(jbutton) == HIGH) {
jbValue=0;
}else {
jbValue=1;
}
[/php]
and output this to the serial port.
[php]
// Erint the results to the serial monitor:
Serial.print("a0 = " );
Serial.print(a0Value);
Serial.print("\t a1 = ");
Serial.print(a1Value);
Serial.print("\t jb = ");
Serial.println(jbValue);
// Wait 10 milliseconds before the next loop
// for the analog-to-digital converter to settle
delay(10);
}
[/php]
For those of you who want an easy life, here is all the code in one block.
[php]
/*
Joystick input with serial output
Reads the analogue input pins from the x and y axis on a joystick along
with the button pres state and echos this to the serial monitor.
The circuit:
* Joystick with x and y connected to A0 and A1
Gnd and 5V connected to Joystick supply and
Joysticj button connected to Digital input 2
Created 22 January 2013
Modified 22 January 2013
by Tim Russell (@timr1972)
This example code is in the public domain.
*/
// These constants won’t change.
const int analogue0 = A0; // Analog input pin that the potentiometer is attached to
const int analogue1 = A1; // Analog input pin that the potentiometer is attached to
const int jbutton = 2;
int a0Value = 0; // value read from the x-axis
int a1Value = 0; // value read from the y-axis
int jbValue = 0; // value read from the joystick button
void setup() {
// initialize serial communications at 115200 bps:
Serial.begin(115200);
pinMode(jbutton, INPUT); // Set button as input
digitalWrite(jbutton, HIGH); // Pullup resisitor
}
void loop() {
// read the analogue values, and the button state
a0Value = analogRead(analogue0);
a1Value = analogRead(analogue1);
if (digitalRead(jbutton) == HIGH) {
jbValue=0;
}else {
jbValue=1;
}
// Erint the results to the serial monitor:
Serial.print("a0 = " );
Serial.print(a0Value);
Serial.print("\t a1 = ");
Serial.print(a1Value);
Serial.print("\t jb = ");
Serial.println(jbValue);
// Wait 10 milliseconds before the next loop
// for the analog-to-digital converter to settle
delay(10);
}
[/php]